How Not To Implement Security: An IoT Doorbell Camera Pentest
- tags
- #Security #Pentesting #IoT
- categories
- Pentesting Security
- published
- reading time
- 7 minutes
This is an ‘informalized’ summary of my bachelor thesis, written with 5 other persons in the spring of 2023.
Our goals were to devise a pentesting methodology, which would then be used to test the security of a car, and analyse any potential findings. Sadly, time and resource constraints meant that we instead had to perform the test on an IoT product.
Note that, to avoid writing a 13,000 word blogspot, I have decided to skip over many parts of the report, and to shorten many others. Most notably, this post will not discuss:
- How we devised our methodology (and why).
- Our research into the field of security & pentesting.
- Most of our tests which yielded no results.
If that is of interest, reach out to me for a copy of the thesis.
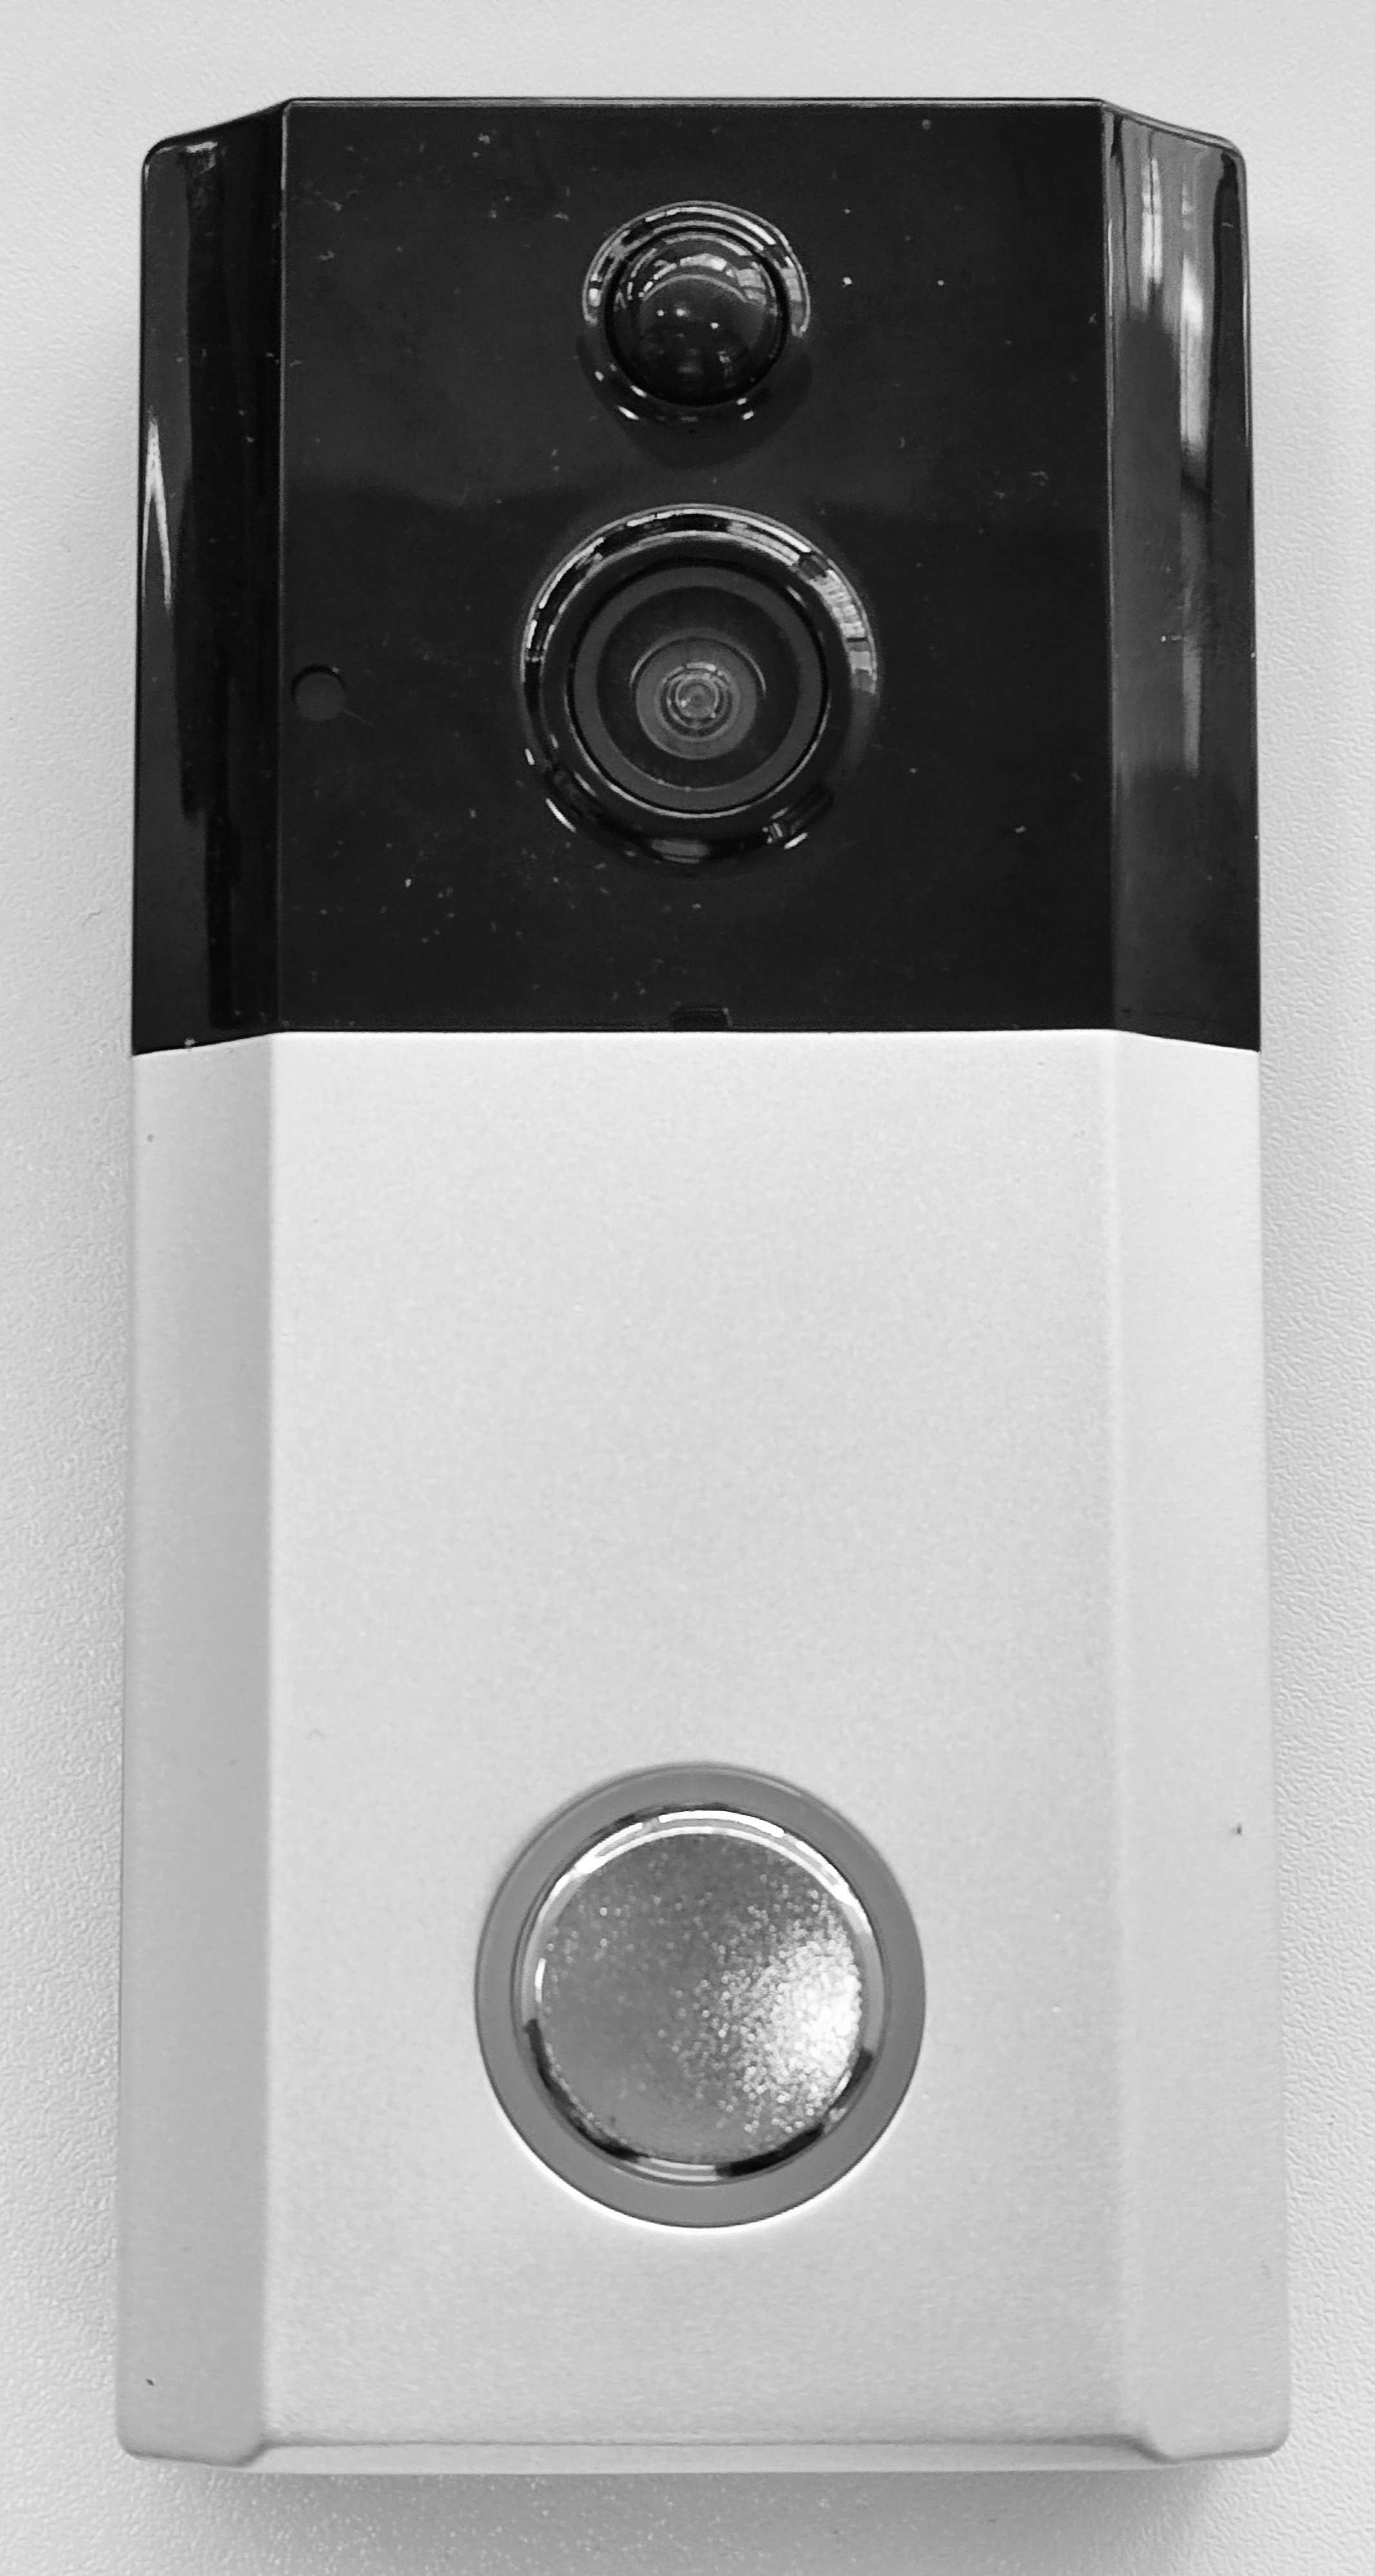
The Device
The product we settled on was a ‘Prokord Smart Home WiFi Door Camera’, purchased through the Swedish electronics retailer Dustin. It is a white-label camera, produced by an unknown Chinese company, and branded and sold under many different names. The software is written by Tuya, a large Chinese corporation who’s software powers millions of IoT devices around the world.
Reconnaissance
We began with basic passive reconnaissance, trying to find any online/pre-existing information on the camera, and its security mechanisams. This search didn’t reveal much, besides from a few Chinese e-commerce listings for the camera under different brands.
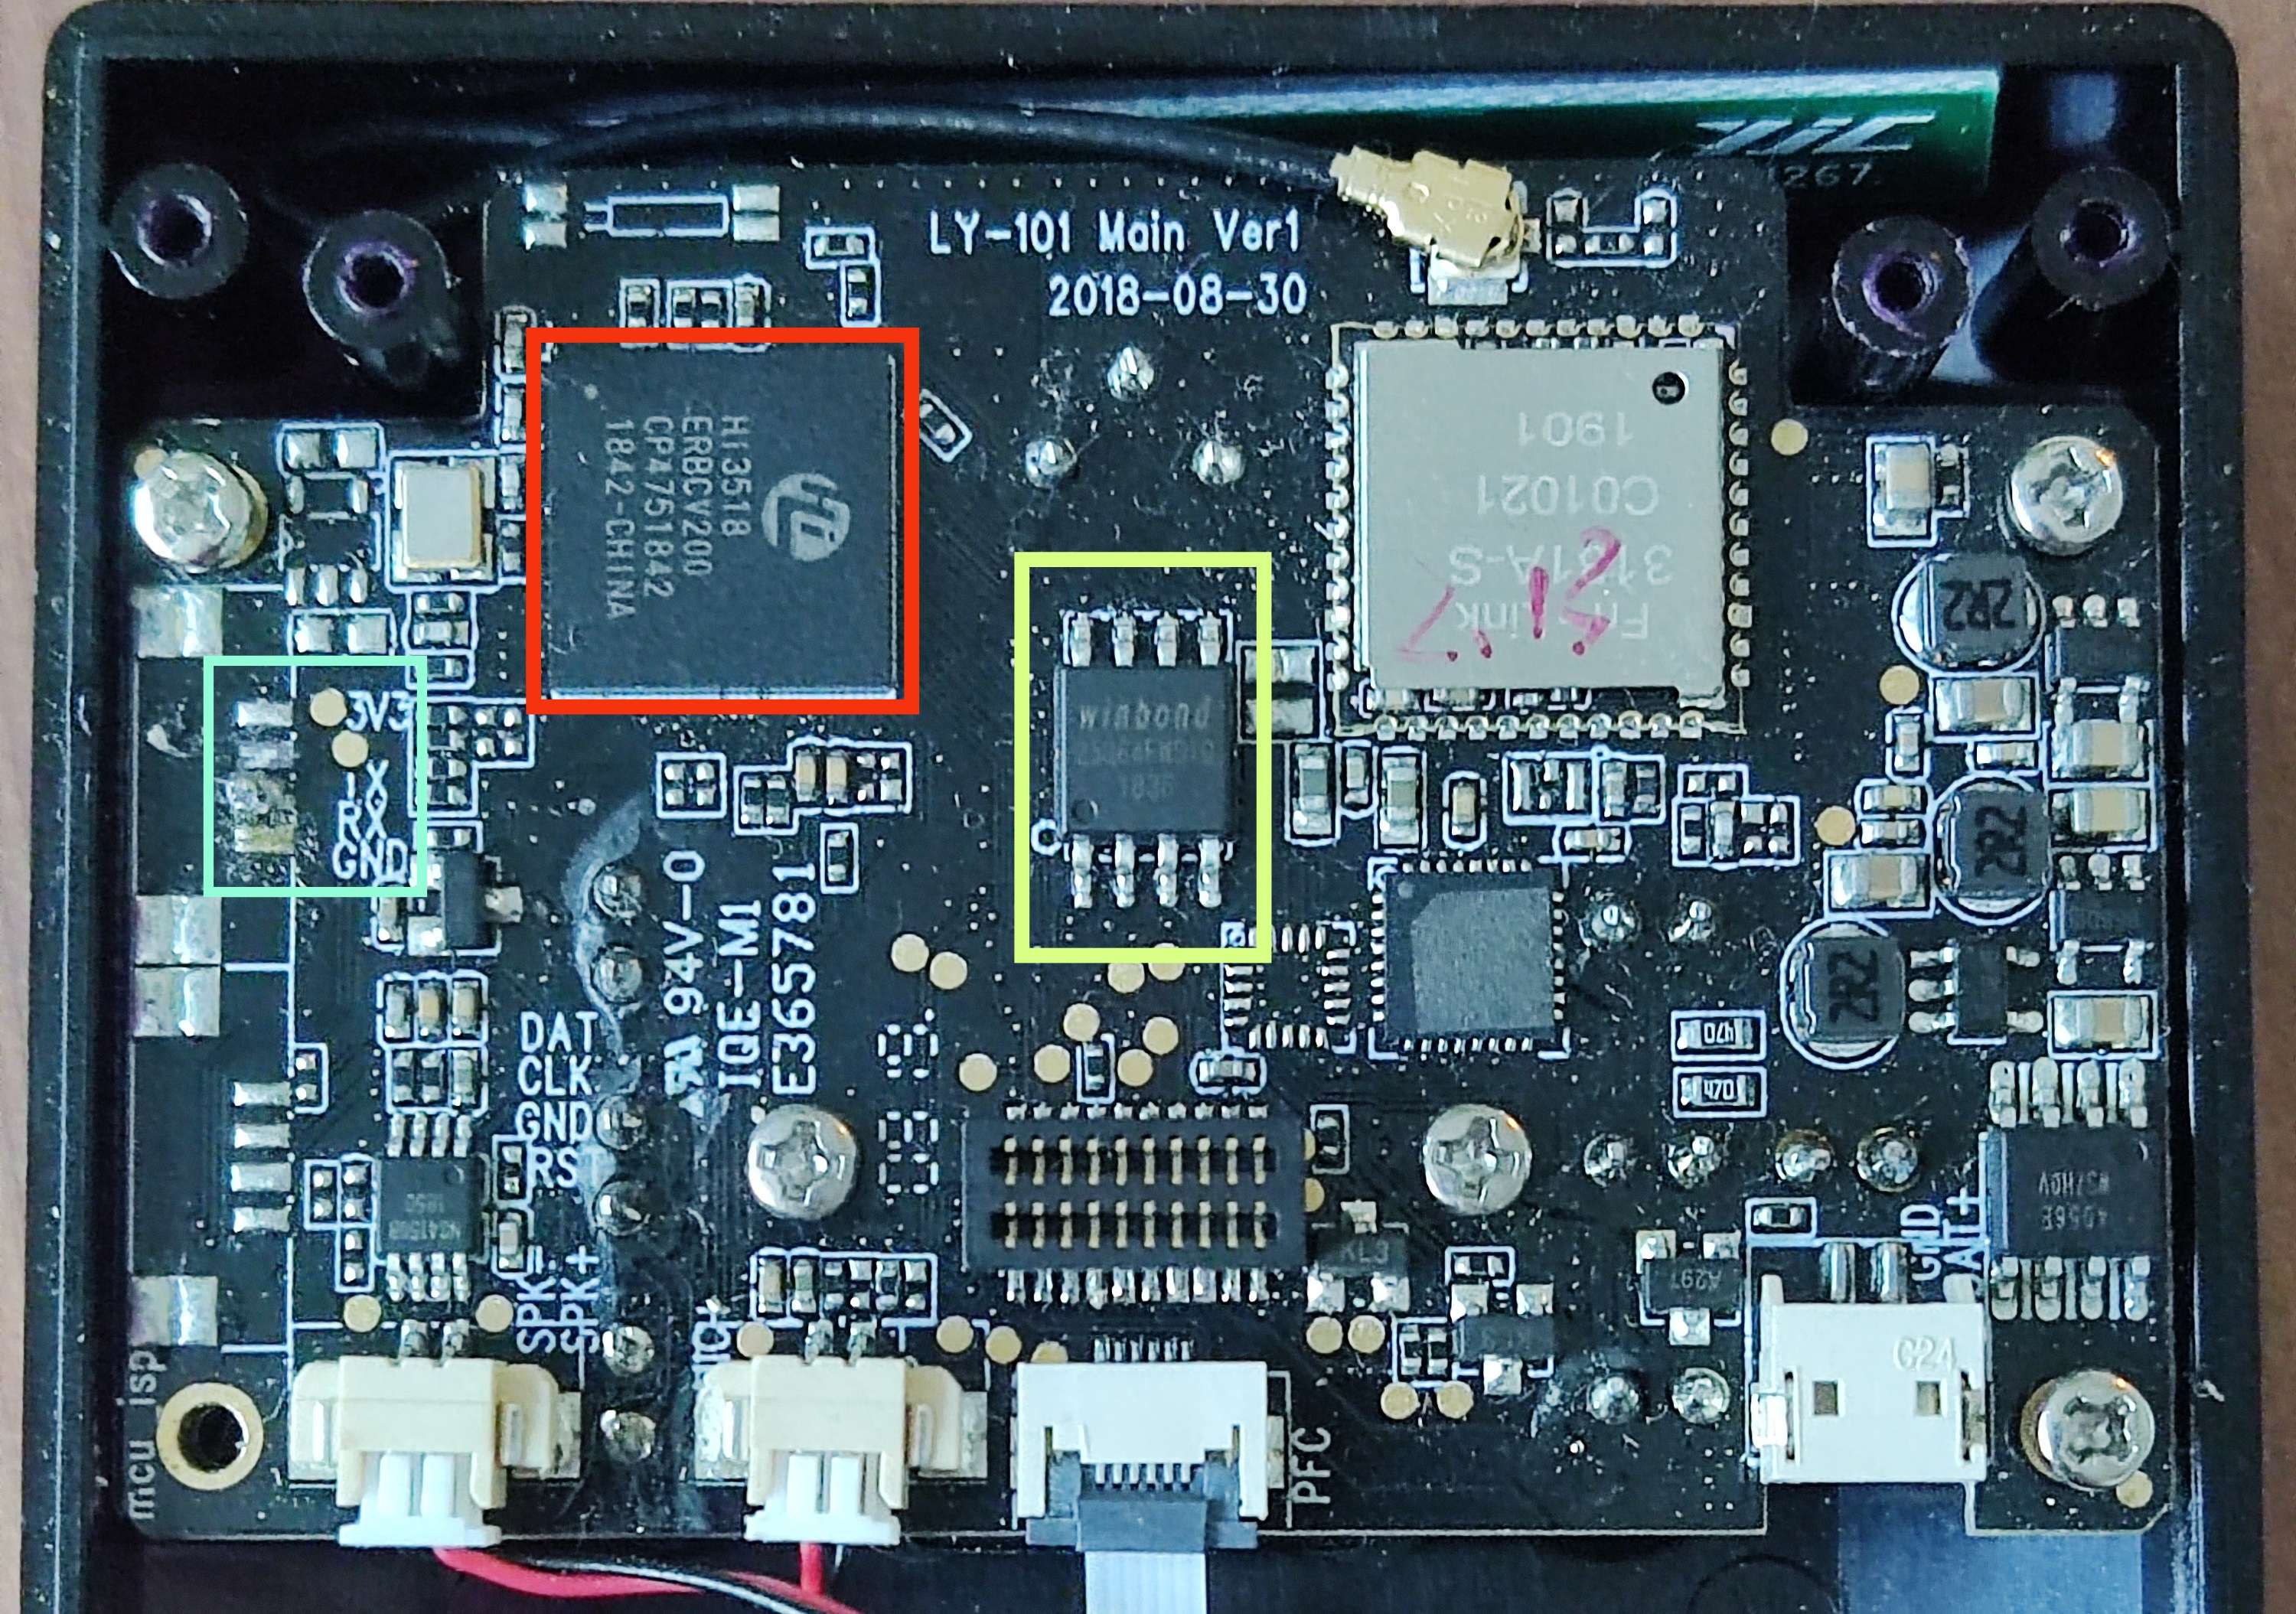
Thus, we quickly moved to active reconnaissance, to try and gain a better understanding of the device’s hardware configuration. Removing the 4 screws which held the device together from the back revealed two PCBs, which held all the devices’ integrated electronics.
The top board acts as a daughter-board, passing, among other things, USB power and SD-card data to the board below (referred to herein as the motherboard). Upon removing the daughter-board, the motherboard and its associated components were revealed. Three of the components were of particular interest, namely:
- The processor - a HiSilicon HI3518E. This is a 32-bit ARM926 processor.
- The flash memory - a Winbond 25Q64FWSIG chip with 8 MB of memory.
- The exposed (and handily labelled!) UART connecting pads.
Lastly, we decided to do some basic network-scanning. A few different setups were tried, but ultimately the one which provided the most information was when the camera and smartphone (used to control the device) were both connected to a local network hosted on the scanning computer. For scanning, both Nmap was used, to identify the services running on the device and any potentially open ports, as well as Wireshark.
UART Exploitation
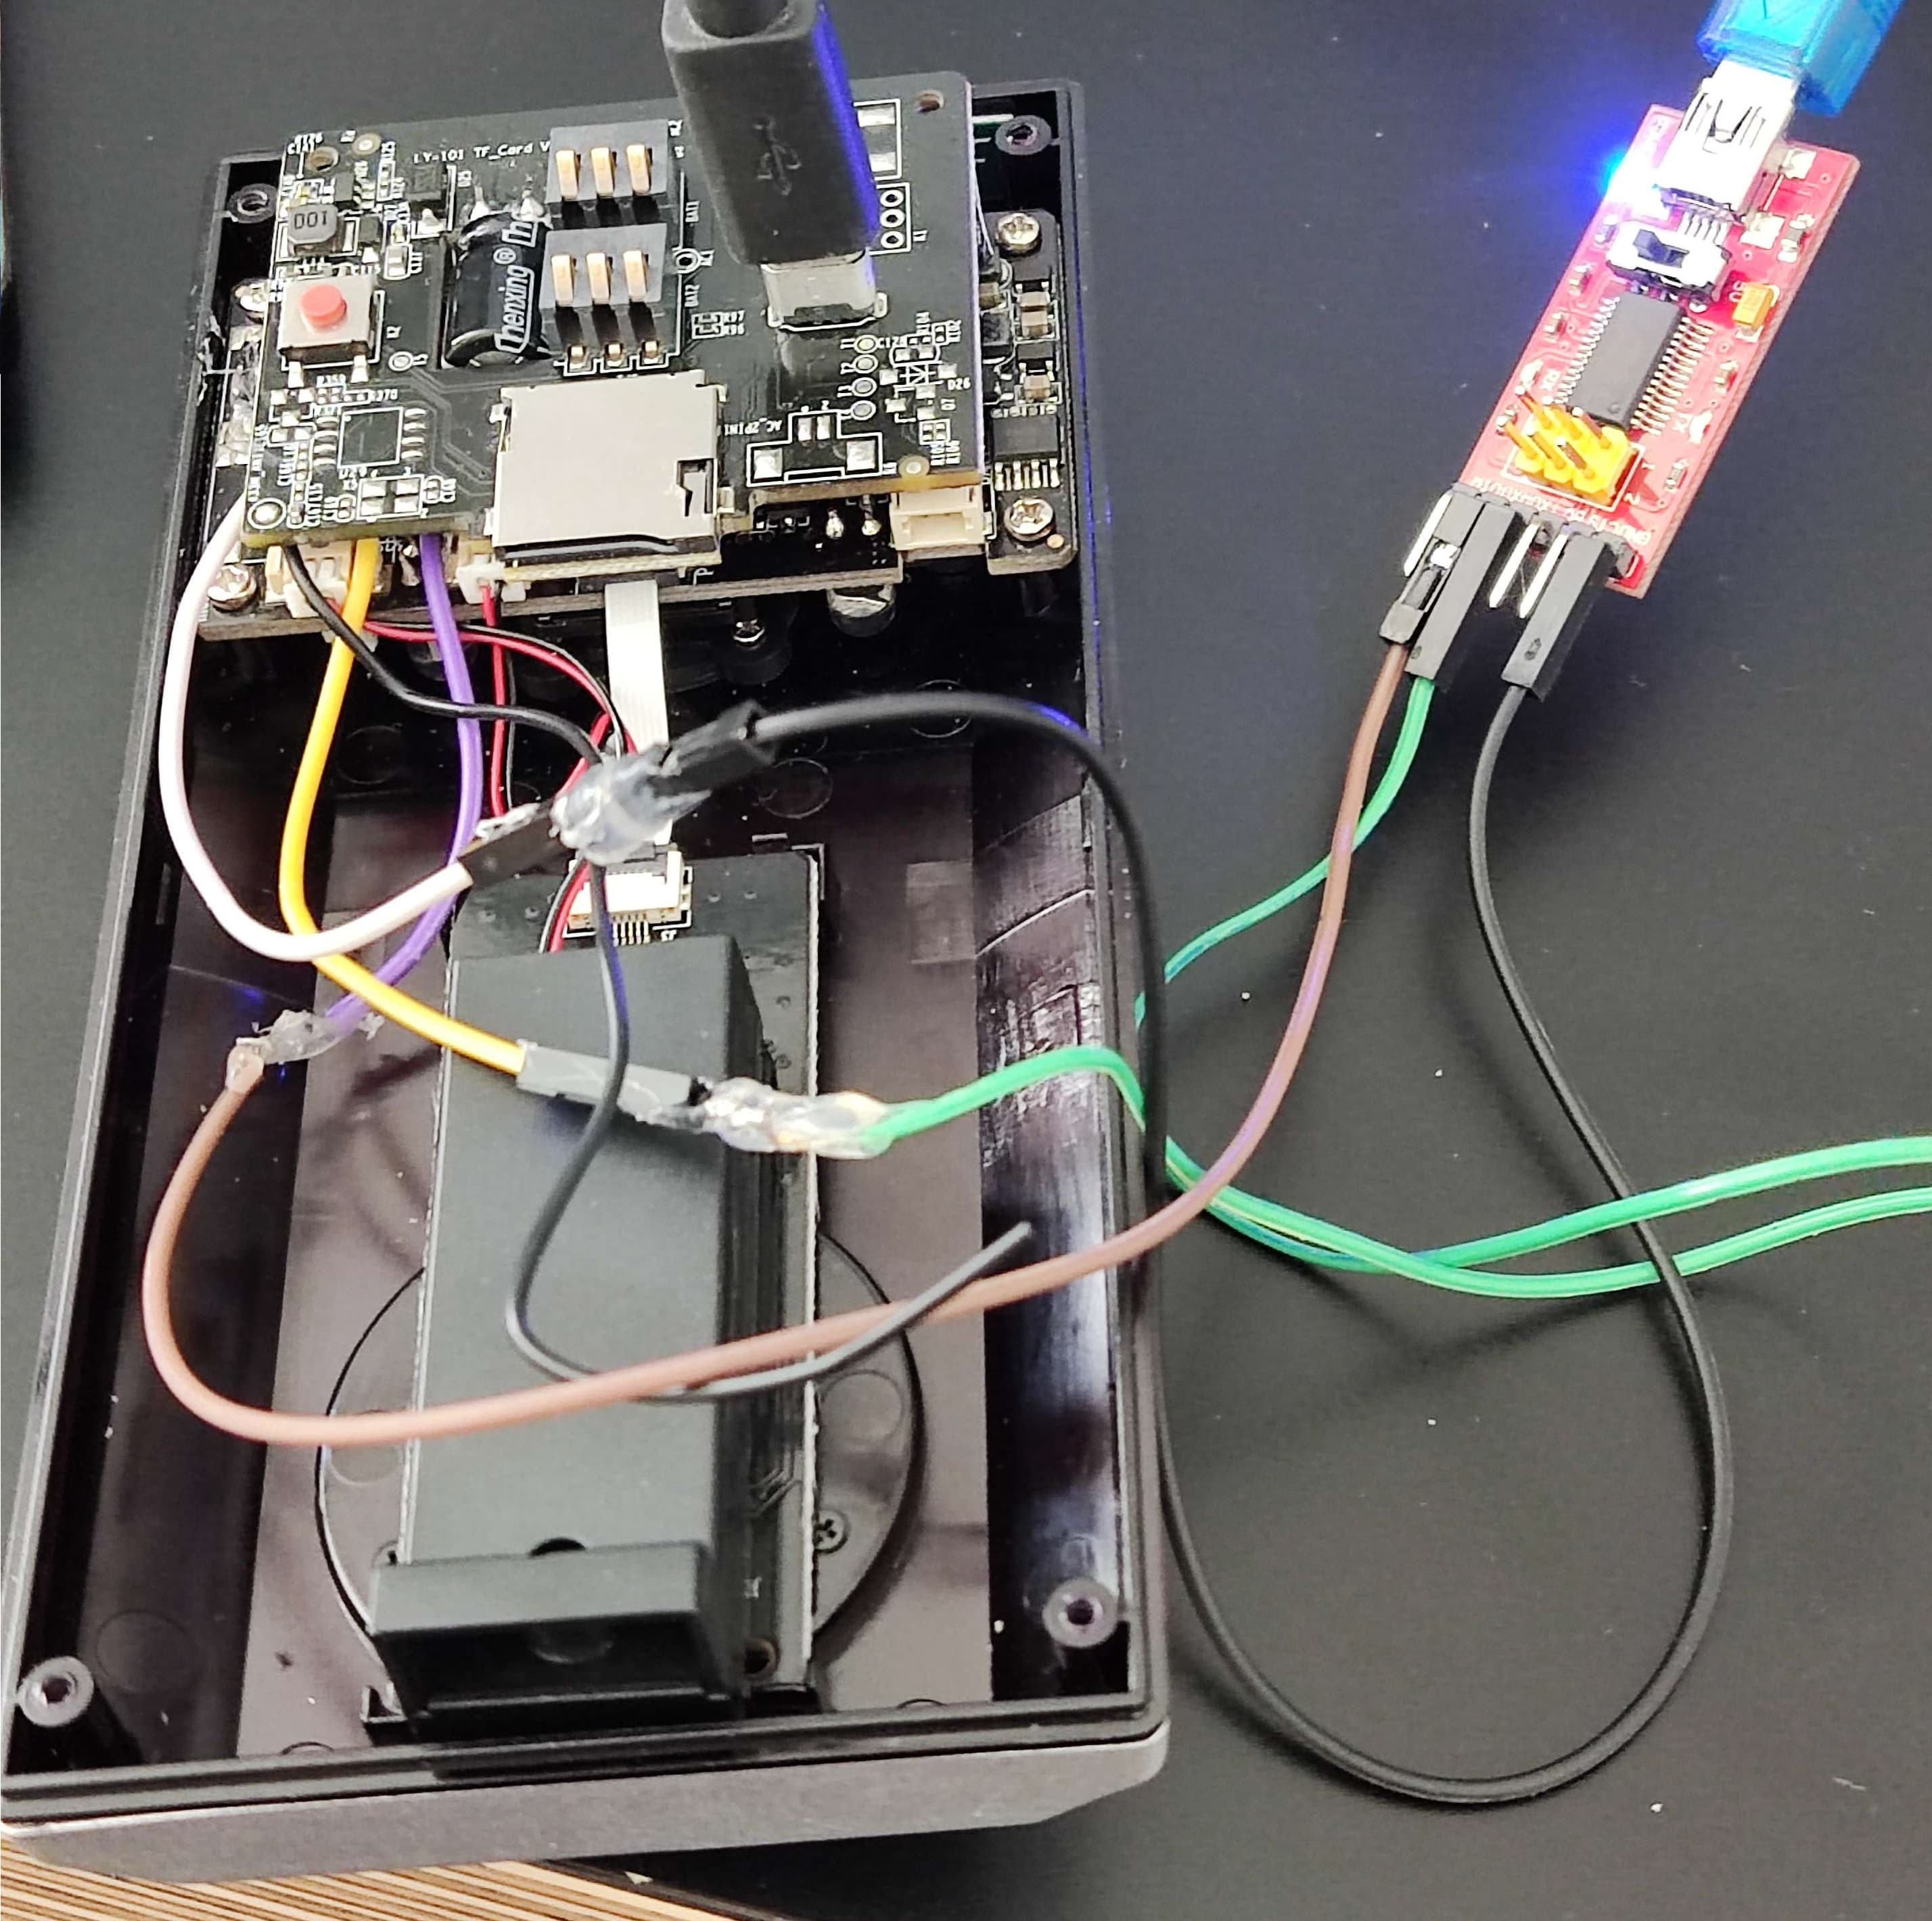
From our reconnaissance, the most interesting finding was the exposed UART pads on the motherboard. As such, we decided that this would be our first plan of attack. We began with soldering wires to the RX, TX and GND pads. The baud rate was then discovered by connecting the soldered connection to an oscilloscope via scope probes, from which the oscilloscope automatically deciphered the correct frequency. With this done, we connected our soldered wires to a Serial UART To USB Adapter, which was plugged into a computer running Picocom in Kali Linux.
So what did we find? Well, as it turns out, everything!
Amazingly, with the camera turned on, and Picocom running, its shell terminal was fully exposed. This, by and of itself, provided a large amount of information about the system’s software configuration, including:
- The type and version of the bootloader, that being ‘Das U-boot’ version 2010.06 (this is a UNIX-like bootloader).
- The OS kernel type and version, namely ‘Huawei LiteOS V200R001C10B031’, version 1.4.6.
- The specific SDK type and version, which is the ‘Tuya IPC SDK’, version 4.5.13.
The shell terminal also provided a constant log of the camera’s operations, mode, and state.
And if this wasn’t enough, we found that much more could be done with the shell terminal - as root access was enabled by default! This allowed us to send commands to the camera (for example help, which conveniently shows all the commands available).
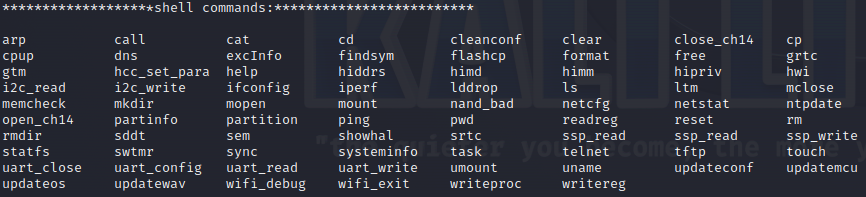
One particularly useful command is ‘wifi_debug’, which prints both the open and closed network ports which the camera uses for communication over WiFi. There are also commands to (amongst other things) read and write data from the camera, as well as view the filesystem and start a telnet session.
To borrow a phrase most commonly used by late night TV-infomercial salesman: “But wait… there’s more!”. During the boot-up sequence of the camera, the exposed shell provides the practical message “Press Ctrl+C to stop autoboot”. In doing so, booting to the OS is interrupted, with the camera instead providing complete access to U-Boot (which as the name suggests is the device’s bootloader).
Like the OS, U-boot provides a list of commands, with associated explanations, if the help command is run:

One command of particular interest was ’fatls’. By calling it, one can browse the entire file system of the camera. Whilst many of the directories seem to either be encrypted or compressed, one JFFS2 directory can be browsed, revealing the ’.wav’ files used for the camera’s sound effects, as well as the configuration files for the camera sensor settings.
Remote Attacks
With the camera fully compromised from a physical perspective, our attention turned to finding any remote attacks or, in the least, attacks which didn’t require taking apart the camera and soldering wires to it. Since we didn’t want to try and exploit/hack the Tuya smartphone app used to control the camera, we took another look at the shell terminal.
QR-Code Panic
By resetting the camera, and going through the pairing-procedure, we found a potentially exploitable buffer. See, to pair a camera and phone, a QR code is displayed in the phone app, which one then scans with the camera. This QR code contains information such as the WiFi SSID name, and password.

Calculating the size of the buffer revealed that the maximum size of the QR code could not exceed 105 bytes. To find out how the camera responded to a QR code larger than 105 bytes, an online tool was used to generate a considerably larger WiFi QR code. By resetting the camera and scanning the new QR code, it was revealed that this caused a buffer overflow internally, which made the whole camera unusable until it was manually factory-reset using the button on the back.

DOS Attack
As mentioned previously, we did a number of network-scans and packet captures. Armed with a list of TCP ports the camera uses, we first set up a WiFi hotspot on a test computer, paired the camera with a phone on the same network, and started up a packet-sender program.
With the setup complete, we began sending as many packets as we could to the device. Within seconds, this caused the camera feed to stop, and the camera completely froze. In short, we managed to perform a DOS without any difficulty!
Implication of Findings
What’s (presumably) apparent by now is that this camera has next to no security protections. With relative ease, attackers could gain complete control of it, and/or disable it from working.
However, the discussed attacks aren’t even the most egregious faults of this camera. Namely, the camera has no motion-detection, and neither does it have any tamper-protection. This means that if one were to use it in any outdoor setting, all a would-be attack needs to do is wait until you aren’t at home … aaand then remove it from its holder.
Manufacturer Response
As we did our bachelor thesis under strictly defined moral and ethical guidelines, we contacted Tuya and sent all of our findings to them. Whilst I can’t share their response word-for-word, I can summarize it by saying that DOS protections aren’t a security problem, and any other findings are the fault of the persons who implemented the Tuya software on the camera, and not Tuya.
Closing Notes
On a personal note, I found our thesis work fascinating. Not only was it a fantastic introduction to cyber-security and pentesting, it was a true eye-opener for me, showing that we can’t, and shouldn’t, take security for granted. I’d love to test more IoT devices in the future, and I will definitely continue learning (and working) with cyber security!
Final Note: As mentioned at the start of this blog post, this is a heavily condensed and reduced accounting of our thesis. If you found this interesting, I’d highly recommend you read the full report. Also, I want to thank my hard-working team members, my ever helpful supervisor, Chalmers University, and Assured AB who held a CAN Hack course for our group before our our topic-switch.